VFI
Introduction
This article will show you how to get the most from a Delphi feature known as Visual Form Inheritance (VFI). If you use VFI extensively your development time should decrease, your applications should have a more consistent look and feel, and should have less errors. Pretty bold claims. Justifiable? Read on and see for yourself.
What is Visual Form Inheritance?
VFI refers to Delphiĺs ability to create new forms which inherit, or are derived from, existing forms. VFI shares the advantages of inheritance in general - the primary one being the ability to capture the similarities of different classes in a hierarchy. In this case the classes are forms, generated by Delphiĺs form designer. Put another way, VFI allows you to write code, in one place, that is common to more than one form, and have multiple forms use that code. Writing code once means more productivity and less errors. This applies both to forms within one application, and between applications as well.
But thereĺs more to VFI than code reuse - thatĺs where the Visual part of VFI comes in - you can use the Delphi form designer to layout forms - and have that layout shared among forms as well. Having forms share a layout leads to a more consistent look and feel, and also improves productivity. Using VFI you design your forms in a hierarchy - capturing similarities higher in the hierarchy.
After youĺve created your forms using VFI, you can make changes to forms higher in the hierarchy, and all the forms below that automatically include those changes. This allows you to add functionality in one place. You can add components and / or code to forms, thus changing all forms which inherit from this one.
An example is in order. Assume you are creating an application to manage customers and their invoices. You determine you need three general maintenance forms - one for the customers, a second for their invoices, and a third for the parts you are selling them. Although each form is displaying different information, certain elements of each form are the same. You determine each form needs a page control with two tab sheets - one containing a database grid, the other which will contain edit controls specific to the table you are editing. Each form also needs push buttons to save changes, cancel changes, add records, delete records, etc.
You could design each form separately, writing the code in each form as well. But a better approach is to start with a generic form, containing controls and code which are common to all forms. Then, you use visual form inheritance to create the forms based on the generic form, customizing each new form as required.
Note that once youĺve created these forms, you can still add functionality to the generic form. For example, you may want to add a background logo on each form, or implement a generic search facility. All you need to do is add this in the generic form, and the specific forms automatically inherit this look and behavior.
Understanding how VFI works requires a working knowledge of a languageĺs implementation of inheritance in general, so a quick review might help.
A Review of Inheritance
Inheritance is a programming construct which allows you to create new classes based on existing classes. The existing class is called a superclass, the new class is called a subclass. As you no doubt know, classes contain both data and code. Sub classes can see both the public code and public data of their super class.
Delphi only supports single inheritance - this means that classes directly inherit from only one class. Other languages support multiple inheritance - this allows one class to inherit from more than one super class. Delphi does support repeated inheritance - this allows class A to inherit from class B, and class B to inherit from class C. In this case Class A can see the public data and code of both class B and class C.
Figure 1:
Figure1: Repeated Inheritance and Multiple Inheritance
As a simple example of this, consider the following code fragment produced by Delphiĺs form designer:
type
TFrmRichEdit = class(TForm)
private
end;The class is called TFrmRichEdit, and inherits from the TForm class. TForm is one of many classes declared in the VCL. TForm, and its superclasses, define data and code which is common to all types of forms. This is where you will find data such as the formĺs font, caption, and color. Itĺs also where youĺll find code such as the Close, Show, and ShowModal methods.
TForm and its ancestors, then, capture the similarities of all forms. If Delphi did not support inheritance, the form designer would have to generate all these common methods and data in every form you created.
To instantiate the TFrmRichEdit class, you first need to declare an object of that class, which Delphiĺs form designer does for you:
var
then instantiate the class by calling its constructor, passing the formĺs owner:
frmRichEdit := TFrmRichEdit.Create( Application );
And thereĺs inheritance in action again. Who declares the Create method? One of TFrmRichEditĺs superclasses (TCustomForm, in the VCL actually).
Once youĺve created an object whose class is a subclass, you can directly access that objectĺs data and methods:
frmRichEdit.btnOk.Enabled := False;
and the data and methods of its superclasses:
frmRichEdit.Caption := ĹRTF Editorĺ;
frmRichEdit.Show;Caption is declared in TControl (several levels up in the hierarchy), and the Show method is declared in TCustomForm.
So far weĺve been discussing the public data and code of a class. What do we mean by public, and are there other ways to declare data and code? Public refers to the visibility, or scope, of the declarations. A classĺs public data and code is visible to the user of the class. In the sample class above, btnCancel, btnOk, and rtfNotes are all public instance variables. There are two other ways to declare instance variables and code in a class - you can make them private or protected. If you review the class declaration above, you will see two empty sections labeled private and public. These are sections where you can add your own code and data. Any additions you make to the private section of the class are only visible to methods of the class. Users of the class cannot see the private data or methods.
Delphiĺs form designer does not generate a protected section for you, but you can add one yourself. Any declarations you make to the protected section are visible to methods of the class, just like the declarations in the private section. The difference between private and protected is to do with sub classes. Sub classes can see the protected declarations, but not the private ones.
With that quick review under our belt, itĺs time to look at how to actually use VFI.
Mechanics of VFI
To create forms based upon existing forms, you need to use Delphiĺs repository. Using the repository, you can create a form based upon a form already in the repository, or in your current project. As youĺll see, you use the same IDE menu items.
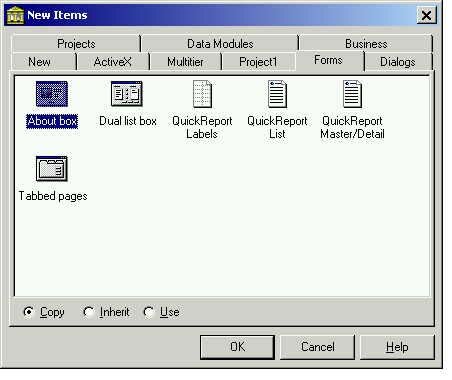
To create a new, blank form in your application you use the File / New Form menu item. To create a form based on existing form, you use File / New - this opens the repository, and then you can choose what you want to create. As youĺll see, you can add your own forms to the repository, but there are a number of forms supplied with Delphi which you can use as a starting point. Select the Forms tabsheet, and youĺll see forms with names such as Dual list box and About box. These forms are stored in Delphiĺs repository and are available for any application to use.
You should note that forms in your current application are also available for reuse just like those stored in the repository, whether you explicitly added them to the repository or not. When you open the repository, note that there is a tabsheet whose caption is the name of your project. Select this tab sheet and youĺll see the forms in your current project.
Letĺs first look at how to work with forms which are already in the repository. Select File / New from the IDE, select the Forms tabsheet, and you should see a screen much like the screen shown in figure 1. You may have more or less forms visible depending upon whether youĺve added or deleted forms to / from this tabsheet.
Figure 2:
Figure 2: Forms Tab of Delphi 5Repository
Note the 3 radio buttons at the bottom of the form labeled Copy, Inherit, and Use. This tells Delphi how you want your new form to relate to the form in the repository
Use means you want to directly use the form in the repository. Any changes you make directly change the form in the repository, thus also changing forms which Inherited from this form.
Copy means you want to duplicate the form in the repository in your own application. Your new form will be completely independent from the form in the repository. If you subsequently change the form in the repository, this will not change this form.
Inherit means the new form is based upon the form in the repository, and retains its link to the form in the repository. If you subsequently change the form in the repository, this will also change all forms which inherit from this form. This is usually what you want.
The only difference between working with forms in the repository, and working with forms in your application is that you can only inherit from forms in your existing application. Itĺs the only option which makes sense.
Once youĺve created a new form which inherits from a form in the repository, you can still change the new form. You can add new components, and write new methods. You can also change things that you inherit from the form in the repository. You can move inherited components, resize them etc., but you cannot delete a component you inherited. Attempting to do so will result in an error message from the IDE. You canĺt delete an inherited component, then, but can achieve the same effect by making it invisible by setting its visible property to false.
Now, once youĺve changed a property of an inherited component, youĺve broken the link, for that property, between the sub form and the super form. For example, assume you move a push button to the left in a sub form, then move the push button in the form in the repository. Because the sub form has broken the link for the left property from the super form, the component in the sub form does not move (it would if you hadnĺt broken the link). You can reestablish the link by selecting the changed component, right mouse clicking, and selecting revert to inherited. This undoes all the changed properties of the component in the sub class.
When working with methods you inherit from a super class you have several options. You can either replace the super class method altogether, or execute your own code in addition to the super class method. Letĺs look at an example of this. Create a new form, inheriting from the Dual List Box form provided in the repository. Double click on the push button labeled > - the button you use to move a selected item from the left list box into the right list box. The IDE will generate the following method template for you:
procedure TDualListDlg2.IncludeBtnClick(Sender: TObject);
begin
end;The keyword inherited means call a method with the same name in the superclass. The code in the superclass is what actually moves the selected items from the left list box to the right list box:
procedure TDualListDlg.IncludeBtnClick(Sender: TObject);
var
begin
end;But note that this code is only called because the sub class explicitly makes a call to it using the inherited keyword. You are free to place your additional code before or after the inherited call. Youĺre also free to remove the inherited keyword altogether - removing the call.
A Quick Example
Imagine youĺve created several forms inheriting from the Dual List Box form in the repository. Youĺve customized the sub forms with information specific to your application, and now you want to add drag and drop capabilities to each form. You want to allow you users to drag items from the left list box into the right list box. If you hadnĺt used VFI you would have to implement the drag and drop capability in each sub form. Because you used VFI, however, you can add the code in one place - the form in the repository. Hereĺs a step by step approach.
- Use the Dual list box form in the repository. Be sure to select the Use radio button.
- Set the DragMode property of the left list box, srcList, to dmAutomatic. This automatically enables dragging when the user holds the left mouse down with an item selected. The alternative mode is dmManual, in which case your program must explicitly enable dragging in code.
- Write the onDragOver event, for the right listbox, dstList, as:
Accept := (source = srcList);
onDragOver is fired when the user drags an item over the control. The event is used to determine whether the control is a valid destination for the dragged item. The code we wrote tells Delphi to accept the drop if the source of the drag is the srcList list box.
- Write the onDragDrop event of the dstList listbox as:
IncludeBtnClick( sender );
onDragDrop is fired when the user drops the item. This code simply fires the same event as if the user had pressed the > push button. No point in duplicating that code.
VFI Under the hood
One of my favorite things about Delphi is that nothingĺs hidden. Everything weĺve just done is implemented in source code. To see how VFI actually works, all you need to do is examine the code produced by the form designer. Letĺs start by looking at the class declaration generated when you simply copy a form from the repository into your application. Weĺll use the Dual list box as our example again. Figure 3 shows the class declaration.
Figure 3:
type
private
public
end;Figure 3: Class declaration when you Use the Dual list box from the repository
And all the code is right there as well, in the implementation section (figure 3 doesnĺt show that). The important line is the one which declares the class:
TDualListDlg = class(TForm)
This class inherits directly from TForm. Everything about the dual list box is right here in this Pascal file, and its associated DFM file.
Now consider Figure 4, which shows the entire Pascal file when you inherit from the form in the repository.
unit Unit3;
interface
uses
type
TDualListDlg3 = class(TDualListDlg)
private
public
end;
var
implementation
{$R *.DFM}
end.Figure 4: Pascal file for Dual list box inherited from the repository
Again, the line declaring the class is the important line:
TDualListDlg3 = class(TDualListDlg)
This shows that the new form simply inherits from another class, TDualListDlg. TDualListDlg, of course is the form in the repository. Note how the new formĺs uses clause includes that unit (DUALLIST). Also note that the project source code, the DPR file, includes that unit as well:
uses
Because your new form inherits from another form, your project must include both forms.
Changes you make to your sub form are simply made to the sub formĺs Pascal and DFM files. If your sub class changes a components position, for example, that change is recorded in the sub classĺs DFM file. In fact, all you will see in the sub formĺs DFM file are the sub form properties which are different from its super class (and thatĺs the best way to see exactly which properties were changed).
The final thing we need to look at in this section is the structure of the repository itself. You may be surprised to learn that the Dephi repository is nothing more than an INI file. The Delphi 4 repository is stored in the file Delphi32.DRO - in the bin directory of your Delphi installation. Open it with Notepad or some other text editor and see for yourself. Figure 5 shows the portion to do with the DualList form.
Figure 5
[C:\PROGRAM FILES\BORLAND\DELPHI4\OBJREPOS\DUALLIST]
Type=FormTemplate
Name=Dual list box
Page=Forms
Icon=C:\PROGRAM FILES\BORLAND\DELPHI4\OBJREPOS\DUALLIST.ICO
Description=Dialog box with two list boxes. Supports moving items from one list to the other.
Author=Borland
DefaultMainForm=0
DefaultNewForm=0
Ancestor=Figure 5: Portion of Delphi Repository concerned with Dual list box
The important line is the section heading - as you can see that tells Delphi where the code is located on disk. There are similar entries for each form in the repository.
VFI in the real world
Technical Articles often paint a rosy picture of development. Just follow these steps and youĺre in programming utopia. In the real world, visual form inheritance can save you time, and make your programs more consistent. But it does take effort. The first time you use VFI you will spend a lot of time designing your form hierarchies. Hereĺs how it usually goes the first time you use it.
You start developing as you always did - you create forms and write code. Then you realize that several forms look pretty much the same, and youĺre writing similar code in each form. At that stage you decide VFI will help - so you find the common layouts and the common code and move those into a generic form. You place that form in the repository, then rework the child forms to inherit from the main form. But it doesnĺt end there. Itĺs unrealistic to think youĺll come up with a perfect design the first time. What usually happens is you continue developing the sub forms, continually looking for things you can move up the hierarchy to avoid duplication. I consider this class design a very similar process to database normalization - youĺre trying to avoid redundancy and duplication. And it takes time.
This design, then, is a very iterative process, and the first time you try it you might not see any real productivity benefits. There again you might. An example springs to mind from one of my own development projects. We designed a standard interface for editing database tables. We provided all the usual features - add, edit, delete, search for records etc., and allowed the used to access these activities both from the menu and from buttons located in a Coolbar. All the common code and layout was stored in a common super class (which we use in all our applications), and the actual editing forms were derived from this common form. Well, the user didnĺt care for the Coolbar - and wanted it changed to a simpler interface. We had almost 30 forms developed this way - but all we had to do was replace the CoolBar, with a ToolBar, in one form and recompile.
The real benefits of VFI, though, come the second or third time you use a design. Remember that you can use the repository to share forms between applications. In our shop, the first stage of our design is to list forms required for an application, and note their similarities. We then decide whether to use existing templates weĺve already developed, to modify those slightly, or to develop new ones. Whichever way we go we rarely start from scratch.
If you want to get started using VFI Iĺd suggest you start with a database maintenance form. Decide how you want the form to look, design it once and place it in the repository. Place as much common code in this generic form as possible, then create actual forms, containing data specific to the actual tables, inheriting from this generic form. As you write code in the actual forms, consider whether that code could be moved up the hierarchy. For each piece of code you write ask yourself whether that code is specific to the data in this form, or whether itĺs generic and other forms could use it. If itĺs generic move it up the hierarchy.
Summary
In this article we studied Delphiĺs Visual Form Inheritance (VFI). VFI allows you to visually create new forms based on existing forms, and provides the same benefits as inheritance in general - class reuse. Class reuse, in turn, leads to faster development time, and more consistent and reliable applications. Understanding how VFI actually works requires a good understanding of Delphiĺs object model, and inheritance in particular. As you saw, VFI is nothing more than a language mechanism (inheritance), some IDE features, and an INI file! I consider it one of the most powerful features of Delphi and I use it extensively. In an upcoming article Iĺll present a generic database maintenance form I use in development, and show how this substantially reduces my own development time.
Author
Rick Spence is technical director of Web Tech Training & Development (formerly Database Programmers Retreat) - a training and development company with offices in Florida and the UK. You can reach Rick directly at . General inquiries should be directed to .